Thursday, 27 April 2017

Smile

Hello crafty friends and as always welcome to my blog. My tutorial post tonight is for Off The Rails and you can find it over at the blog along with lots of inspiration ideas and also this  months awesome challenge. All you have to do is hop on over. 

I have created a layout for you of my beautiful caring friend Chez. She is an amazing person and a real special friend to me and my two boys. 
Now for my tutorial. 

This month on the blog it is all about recycle but for this page I have done something a little different in the recycle. I didn't put a recycle item on the page but chose to use one to create the background.
Get ready for it...... I have used a toilet roll. Yes you have read it right, I have used a used toilet roll.


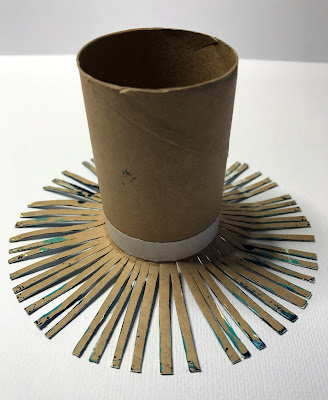
As you can see by the toilet roll photo above you simply start with the toilet roll, scissors and I run some tape around the roll but just so I would cut an even cut around. The higher up the roll the longer the flower petals will big (Bigger flower)

I have just cut up to the tape all the way around.

 This is one I cut and used the other day and it is a larger one.


This is the one I cut for this page I have created.

The one on the left is the one made for this page. You will be able to use it over and over with different colours but make sure the dry between colours.

Place some paint on a messy mat and then it is time to put the toilet roll in the plaint and dab it onto your background surface. You then repeat the process with as many different colors as you choose.


 Once you have dabbed it in the pain make sure you lightly dab over to the side before gong onto your background surface. This is for two reasons and the first is to get the feel of the amount of pressure you have to use and the second is to make sure it isn't over loaded. Always remember you can add but once it is there you can't take off.  


It is then a matter of repeating the process until you get it like you want in colours. Make sure you dry between each colour though.

 Once this is done it is time to do the center of your flower and for this I used a dry firm bristled brush. I did a little mixing of colours by dabbing in the center and not making it solid.


Once this was done I used a fine soft brush and green paint to create the stems and leaves. Once this was done it was time to decide what products I wanted to use on the top of my background while the paint dried.


Below is the stenciled background I created on an off cut of white cardstock to mount my photo on.


These are the products I chose to use and some I inked the edges of. Then it was time to put it together. Part of doing that I decided to colour the business card hanger around Chez's neck in black as you can see from the finished page. I wasn't happy with the bright pink so I tied it in with black.


so as I said earlier - recycle month on the blog and in my DT post I used a recycle on my page but for this I used a recycle to create my back ground.


These are the products I used - 
White Cardstock
Toilet paper roll
Dylusions Paint - London Blue mixed with White Linen, Crushed Grape, Vibrant Turquoise
Kaisercraft Paint - Breen, Mocha, Eggplant, Coastal Blue, Dusty Pink, Antique White
Distress Ink - Frayed Burlap
Black Journal Pen
Kaisercraft - Acetate Shapes
                                    Collectables - Ooh La La
                                          Clear Stickers - Script Words
       Stencil

I hope you have enjoyed stopping in to see my page with  a background created with a toilet paper roll. Remember you can use them over and over. Don't forget to join in with us on this months challenge as I'm sure you will enjoy it. Don't forget that when you pop on over to Off The Rails you just keep scrolling for some really awesome creations and wonderful ideas and inspiration from the rest of the team. 
Happy Crafting Everyone

Friday, 21 April 2017

Lest We Forget

Hello all and a warm welcome to my blog. I was abut to head off to bed and the rain started again. I know this means I was going to lay there for ages just listening to it come down on the roof. Yes we need it but if it just stayed away for me to get to sleep and tomorrows game I would be happy. Harley is playing in the Under 15 for the Hoppers now (Under 12 behind him) and Riley has started Boundary Umpiring the Seniors. At the football all day at Newlyn and it would be much better if it didn't rain - Guess that's football.

Anyway enough of that it's time for what I'm meant to be posting, a layout for the challenge over at ARTastic Challenge Blog. Like always they have a beautiful piece of artwork for the challenge.
This month they feature an ANZAC tribute artwork by Kenneth MacQueen called Wild Poppies.  Their criteria this month is to use pops of red on your page. I think I covered that. 


My page only has a little of the blue and I chose to use more of the colours in my photo. I made sure the photo had the blue in it too though. 
Anzac day - A day to remember those who so bravely served and those who give their lives to give us freedom. 


I created my page on White Cardstock with the following products - 
Modeling Paste
Kaisercraft Clear Stamp - Bubble Wrap
Darkroom Door Texture Stamp - Numbers
Distress Ink - Brown (Mixed with Water and sponged on)
 

Lindy's Stamp Gang Magicals - Steampunk Sepia and Glory of the Seas Gold
  Lindy's Stamp Gang Magical Flat - Rizzo's Rowdy Red
Circle Die
Black Journal Pen
Archival Ink - Jet Black


Faber Castell Gelatos - Gold, Blueberry, Blood Orange and Red 
Red and Yellow Journal Pen
Copic - Black
Chippie Photo Frame
Distress Marker - Festive Berries


Black Cardstock
Weave Extras - Teeny Tiny Letter Stickers
Kaszazz Stencil - Waves Cloud and Curves
ScrapFX Corner Chippie 
Tim Holtz idea-ology Tissue Wrap
 

I hope you have enjoyed popping in and having a look at my page for the challenge over at 
My family will be marching Anzac Day and remembering the fallen. 
Thank you for stopping in. xxx 


Thursday, 20 April 2017

MEMORIES last for ever and ever

Welcome to my blog and my DT post for Off The Rails Scrapbooking. We have an awesome challenge this month and I loved doing it. 

The theme is RECYCLE SOMETHING...... and then of course there is the mood board. Check it out, the inspiration on it is fantastic.


Now for my take on the challenge. I chose to use an art glass fairy that my mum made many years ago for a mobile. It was created on acetate. So you can see there are a couple of pieces that have chipped off over the years but I think it still looks great. The framed photo is my mum when she was very young before she become my mother.


The patterned papers I created my page with ate Kaisercrafts - Prairie Lane Collection and I think they go so well with the fairy. The other products I used are -
Ivy Leaf Die - Cottage Cutz
Green Tara Flowers
Scrapmatts - Scrap word
Black Journal pen


Dusty Attic Chippie - Fram #2
Distress Marker - Black Soot
Wink Of Stella - Clear
Archival Ink - Jet Black


Since the passing of my mum I have not been able to part with anything she has given or made for the boys or myself. I now know I never will. When this challenge come up I thought of this fairy straight away. She had been packed away in a box some time ago and I new that she had to be dug out and scrapped and this was just the right challenge for that. I'm so glad I couldn't part with anything but more glad I have a special place for it to be seen and admired again.

Thanks so much for stopping in and having a look at my page and memories of my mum. Please call over to the Off The Rails Scrapbooking Blog and join in the fun. You can get to see other DT inspiration for the challenge. Come and join us, someone is going to be a lucky winner too and it could well be you. Let us see what you recycle. 
Happy Crafting xxx 


Card & Tag

Hello crafty friends and welcome to my blog and my DT post for Megs Garden. If you hop on over to the Meg's Garden Blog you will also be able to scroll through the other DT members work and get some wonderful inspiration on using many different Meg's Garden patterned papers and products. 

For my post I have used the very beautiful Sherlock Vol II patterned papers. Wow are these papers are stunning, so masculine. When I was creating my card and tag I had my Grandfather in mind. He was a Gardner and for some reason the colours and pictures on these papers reminded me of him.  
Now for my card first....
 
 
My tag and clock are fussy cut from the patterned papers. On my back ground on top of the patterned paper I used some Sand Mesh Ribbon, then placed a strip of black cardstock which I used a gold pen and placed dots around the edge. 
Over this I used a a Prima Vintage Label that I molded from the beautiful moulds that are available in the Meg's Garden Store. There are different designs and I love them all. I have used the paper clay that Meg's Garden Store also have to go with them. They are so easy to make. With this one I decided to use Jet Black Archival Ink on it and then placed Kaisercraft  mini Alpha stickers on the label.
A couple of pieces of Dusty Attic Chippie and then some Black Raffia tied through the tag and it was finished. Ready for the envelope and a special male friend.  
 
  
Now for my tag -
 
 
Again the beautiful masculine Sherlock Volume II patterned papers, fussy cutting from them and the Black Raffia. The other items I used for this tag are Vintage Mechanical Clock and a china bead. 
Both the card and tag are simple but look so nice and the colours are perfect for a guy. 


Megs Garden Products - 

I hope you have enjoyed popping in and having a look at my latest creation for Meg's Garden. I also hope you have a wonderful weekend and please keep calling back. There is always something to see and I just love getting visitors. 

Sunday, 16 April 2017

Unique

Hello and as always welcome to my blog. My DT post for this Easter Sunday evening is for 
Lets Get Sketchy and boy did I love the colour pallet and sketch for this challenge. As soon as I looked at it I knew which photo I wanted to use and also what the title would be.

My page is of my eldest son Riley and to say he is unique is an understatement. I think that is what I love about Riley's personality so much, there is deferentially only one of him and then the mold was broke lol. He is so different to his younger brother. He loves to do things that no one would expect, join in on everything and to have fun where ever there is a chance to dress up.  This photo is the fun side of Riley, his way to express the fun side of himself is dressing up. Normally he is very serious and dedicated to his studies music and swimming. This fun boy that shows in this photo is adorable and one I love to see. 

This photo was taken at the school swimming sports where they encourage the students to dress up and then there is a fashion parade. Yes you guessed it, Riley won. The dance he did coming back with his hands in the air was so funny. He did it with two girls dressed up as well. One on each arm they took to the catwalk (well the end walkway of the pool). 

Now it's time for the challenge and then my photo -


I was inspired my the yellow and blue in the mood board colour pots. 
  

The products I used are -
Patterned papers - Simple Stories - Summer Paradise
 Texture Paste
Tim Holtz Stencil - Bubbles
Kaisercraft Wooden Flourish - Wooden letter words


Distress Marker - Evergreen Bough
Black Journal Pen
Molossi Glases Chippie
Gold Metallic Marker


Wink Of Stella - Gold
Distress Marker - Black
Kaisercraft Clear Stamp - Grid
Spellbinders Die


I hope you have enjoyed stopping in and having a look at my latest creation for Let's Get Sketchy.
Please hop on over to the blog and join in the fun with us in this great challenge. I would love to see what you create.  


Baby Brenda

Hello crafty friends and welcome to my blog. First I would like to say Happy Easter and I hope that your Easter holiday has been shared with family and friends and been wonderful.

Tonight I would like to share with you my DT page for Colorful Creations. This second challenge for the month is a great one. I found it a fun challenge and i hope you will too.
Now for the details - 
 For this challenge you need to create a project using only items that start with the first letter of your first name. (For example: Brenda (black paper, blue papers, buttons, brackets, etc....Get the idea? 


 For my page I chose to use the following B's -
Brenda and Baby word
Baby Photo (Me)
Birds
Birdcage 
Brown inking
Blue Frame
 Blue Flowers
Blue paper doily

Now my take on the challenge - 


I created this page on Kaisercraft patterned paper - My Secret Garden. 
The other products I used are -
Kaisercraft Fusions - B03 and B04
Copics - Clematis, Process Blue and Aqua Blue


Kaisercraft Doily Die
Kaisercraft Sticker Sheet
Molossi Birdcage Chippie
The Craft Stall Ply Wood Frame


Kaisercraft Bird Die
Distress Ink - Walnut Stain
Viva Inka Gold - Steel Blue, Ice Blue, Aquamarine, Old Silver and Orange (on beak)


I hope you like my page for this challenge and please call over to Colorful Creations and join in the fun with us. Happy Crafting xxx


Wednesday, 5 April 2017

Life Is Better On The Beach

Hello crafty friends and welcome to my blog. I would like to share with you my post for 
Let's Get Sketchy and my page is of my two sons Riley and Harley. Both my boys have a huge love of the beach and would spend every spare moment there if they could. They both love body boarding and Riley loves surfing. If they could they would be on the boards from daylight till dark.

As always there is a great sketch for the challenge at Let's Get Sketchy and we would love to see you join in the fun with us over at the blog. 


Now for my take on the sketch. 


The products I used for this page were -
Kaisercrafts patterned papers - Sandy Toes
Kaisercrafts sticker sheet - Sandy Toes
Lindy's Stamp Gang - Starburst - My Mojito Green
Brown Journal Pen
Black Journal Pen
Distress Ink - Brushed Corduroy


I love watching the boys on the beach and in the surf. Fresh air, laughter and fun are perfect. I lay on my towel with a book and cold water the camera never far away. If only I could freeze time.
But for now its time for the 1st Let's Get Sketchy challenge for April and if you hop on over to the blog you will find more inspiration and the link to join in the fun. I look forward to seeing your creation. Happy Crafting. xxx